While a Single Sign-On (SSO) saves your organization and your team members from the hassle of memorizing long and complex passwords and prevents the possibility of being locked out for incorrect password entry attempts, we provide the SSO feature you need in your AutoSPF Team account.
Here are the steps to set up your AutoSPF Team with a Single Sign-On:
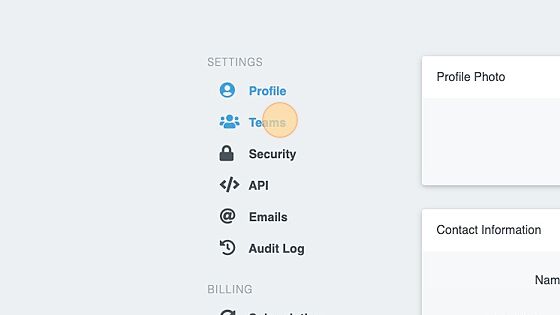
- From the left Nav bar, navigate to "Your Settings"

- Next, on the Settings menu, select "Teams"
- Scroll down to the "Current Teams" section and click on the cog icon next to the Team that you wanted to set up an SSO.
 If you haven't created a Team yet, you can follow the "How to build and modify Teams in my AutoSPF app?" article to create one.
 - From the "Team Settings page," scroll down to the "Setup Team SSO" section

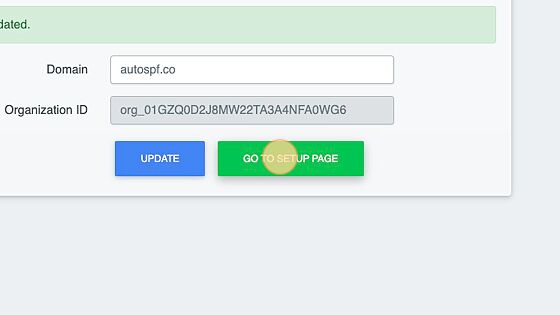
- If you haven't already done so, you will need to first enter the name of your Domain in the field provided, then click the 'Update' button. This will populate the Organization ID field and make the 'Go To Setup Page' button available.
- Then click on the "GO TO SETUP PAGE" button.
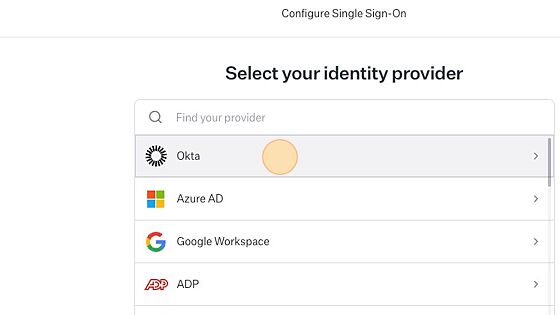
- You'll be redirected to the "Configure Single Sign-On" page. Choose the Provider you have that you wish to use as your Team's SSO for your AutoSPF account.
- As soon as you've selected your Provider from the list of options on the Configure Single Sign-On page, you'll be redirected to another page that provides a step-by-step guide on how to complete the configuration and how to test your setup. Simply follow the guide by clicking on the "Continue To Next Step" button until you fully completed and tested your configuration. If upon completion and testing, you've got some errors, check out at the bottom of this page for a guide on how you can seek support.

- Or, if you prefer to use SAML than SSO, go back to the "Configure Single Sign-On page," scroll down to the bottom of the page and choose "Custom SAML."

- When SAML was chosen, you'll be redirected to a step-by-step page on how you can complete and test the setup. If upon completion and testing, you've got some errors, check out at the bottom of this page for a guide on how you can seek support.

- On the contrary, if you choose to set up an OpenID, you can go back to the previous "Configure Single Sign-On" page and at the bottom, select, "Configure OpenID Connect."

- Similarly, you'll be redirected to another step-by-step page. Simply follow the steps to complete the OpenID setup and test it. If upon completion and testing, you've got some errors, check out at the bottom of this page for a guide on how you can seek support.

Quick Video Guide:
Please note that we may change the user interface in the future, however, you may always check on AutoSPF Settings > Teams page to configure your Team's Single Sign-On. Please note that only the account Admin have an access to this feature.
How can I seek support if after following the SSO configuration steps, I've got some error or my tests failed to return what is expected?
You can reach out to our Help Desk support by sending a test report using the given format below:
Steps to replicate the issue (indicate the actual steps, not the ideal steps, that you did which produce the result you are reporting)
Expected Outcome: (indicate what exactly you expect to happen?)
Actual Outcome: (indicate what actually happened?)
Attach a short recording or screenshot for a faster evaluation of the reported issue